Out of whim, I decided to change the font type of my entry titles, as well as my sidebar and footer headings tonight, and thought of creating a post on how I did it to share to those who want to do the same for their blogs. Years of blogging have taught me that fonts play a role in creating an impression for your blog and making it stand out. They help bring out your personality in your blog and may either help attract or turn off readers.
Now, you can actually control what fonts to use on your blog, and you can do this with the following easy to follow steps:
- Decide which typeface and font you want to use. When I first started, I didn’t know that typeface and fonts are actually 2 different things. The typeface (sometimes also referred to as a font family) is like a collection of related fonts, while fonts refer to the digital file that has the specific weight, width, style of a typeface. The most common types of typefaces are as follows:
- Serif- a typeface whose main feature is a small line added to the beginning and end of the main strokes of a character.
- Sans-Serif- a typeface without serifs (‘sans’ is a french word meaning ‘without)
- Script/Cursive Fonts- a typeface characterized by fluid strokes similar to a hand writing.
- Display/ Decorative Fonts- a typeface that can be artistic and eye-catching, they are made to stand out on a page and are perfect for headers and titles.
- Monospace- a typeface that has fixed character width and pitch, making them occupy the same horizontal space.
In my case, I wanted a font that resembles a handwriting so I chose a script/cursive font.
Once you’ve made up your mind on the specific typeface to use, you can now choose a specific font. There are lots of sites on the internet to choose and get custom fonts, and not all of them are for free. A good place to start for free custom fonts is
Google Fonts, with a catalog of over 800 fonts.
- Add a custom font. Now, adding a custom font from Google Fonts is easy. Here's what I did:
- First, use the filter on the side bar to make your search easier. You can set the typeface, number of styles, thickness, and other font characteristic that you want to see in your custom font. You can also sort them alphabetically, by popularity, etc. If you’re looking for a particular font to add, you can also type its name on the search bar. Once, you’ve set your filters, browse through the gallery, and if you want, you can even type on the text box if you want to see how a particular letter will look like in a certain font type.
- Once you’ve decided which font to use, click on the ‘+’ button at the top of each font type to add it to your selection.
- A small rectangular box will appear at the bottom of your screen and it will reflect how many font families you’ve added.
- Once you’re done, you can click on the rectangular box to expand it and you’ll see this:
a. Your Selection: Shows the names of all the fonts you’ve added
b. Clear All:An option to clear the selection & start over again
c. Load Time: Indicates how fast the fonts will load on your page
d. Embed tab: Contains the code for embedding the font in your HTML document, as well as
the CSS style to apply to your CSS stylesheet
e. Custom tab: Gives you the option to choose want font style you want to include per font
family, as well as what language to use.
When you click on the rectangular tab, you will see this.
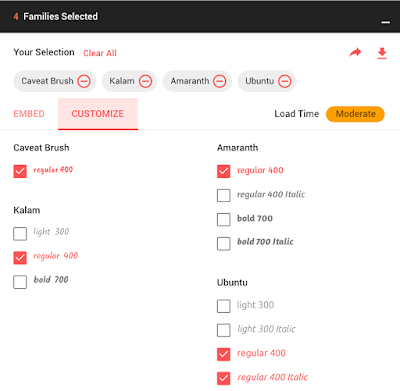 |
| This is what you'll see when you click on the 'Customize' tab |
- If you’re all set with your font of choice, open Blogger and go to ‘TEMPLATE’ and click on ‘BACK UP & RESTORE’. Download a full back up of your template before customizing anything to make sure you can revert the changes back to your original layout in case anything goes wrong.
- Now that you’re ready to edit your template, click on ‘EDIT HTML’. Click on CTRL + F (PC) or COMMAND+F (MAC) to open the search box and look for the <b:skin> tag, which will be highlighted in yellow. Then, copy the embed code from google fonts and paste it directly above the <b:skin> tag. Add a forward slash (/) right before the closing bracket (>) to prevent any errors.
 |
| This is how your template will look like and the <b:skin> tag is usually easy to find at the top of the template. |
 |
| This is the embed code that you need to copy from google fonts |
This is how it should look like when the embed code is pasted above the <b:skin> tag. Make sure to click the black triangle beside it to expand its contents, where you'll see the CSS styles.
- To apply the font on specific parts of your blog, you’ll need to find the CSS selector and add the CSS style to it. Here’s an example:
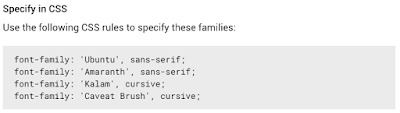 |
| This is what you'll need to copy in Google Fonts and apply in your CSS stylesheet |
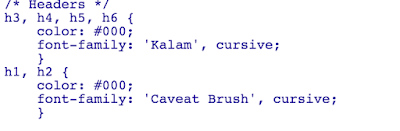 |
This is where it should be applied. |
‘H1, H2, H3 and so on refers to header. In my case, H1 & H2 pertain to post titles and sidebar and footer headers. It may be different with your template so to cross check which part of your blog they stand for, you can click on preview and see to which parts the custom font has been applied to. Once you’re sure of the changes you’ve made, you can click on ‘SAVE TEMPLATE’ and you’re all set!
Aside from the font type, you can also change the font size by changing the number values as shown above.
Hope I was able to share something useful to you (If I did, a link back would be a great way to say thanks ^^). Do you know other ways to add custom fonts? Please do share them with me in the comments section :)